Positioning, Making and Installing the Shelter’s Foundation
After finalizing the design, the first step in making the shelter was to install the foundation. My 20 inch ball scope is mounted on a dual axis tracking platform that I invented specifically for ball scopes. Unlike a non tracking dobsonian, the tracking platform must be aimed towards the pole to ensure proper tracking, just like a Poncet platform, or any other type of equatorial mounting would. I decided on a shelter dimension just large enough to protect the telescope, with about 6 inches of space on each side. For these reasons, I had to position the cover in a north-south orientation since there is just enough room in the shelter to hold the telescope on it’s tracking platform if it is parked looking north.
Since my backyard is exactly north-west of the house, it meant that the cover would need to be angled about 45 degrees with relation to the sides of the yard. The telescope’s observing position was carefuly determined with relation to the street lighting and neighgborhood environement. As the first pictures in this thread show, my backyard is surrounded by trees. To the north-west, at the end of the backyard is an 80 foot deep ravine. There are large, mature trees at the edge of this ravine which pretty much hide that part of the sky all the way to about 70 deg altitude. To the north-east is an 8 foot high cedar hedge my neighbour and I installed about 7 years ago. It will be important to keep triming this hedge and prevent it from getting higher than it presently is. With all these obstructions I end up with an observing area roughly spanning a north-east to south-west line, unobstructed across about 20 deg on each side of that line. Throughout the year most objects visible from my lattitude, 20 degrees below the equator and up to about 70 degrees north, eventually cross this meridian and can be observed from the chosen location.
So, you might ask, what do you do if an object you wish to observe is hidden by the house or all those trees? If there is little or no snow on the groud I unplug the fixed power supply and switch to battery power (a 10 second operation). I then pull the retractable handle out of the base of the 20 inch tracking platform, lift it up on its large, permanently mounted wheels and just roll it in the yard (or down the street if necessary: that’s how portable this telescope is) with the telescope fully assembled, to a location where I will be able to observe whatever it is that was obstructed. The shelter is just that: a shelter. It doesn’t prevent the telescope from travelling (there are no walls to obstruct movement).
Here is a picture showing where I ended up positioning the shelter:
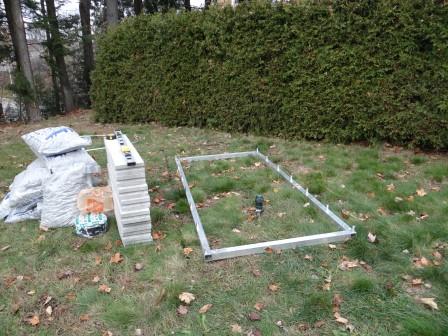
The picture shows the foundation materials on the left and what will become the bottom aluminium frame of the cover (more on its construction later in this thread). I planted a lawn sprinkler at the location where the center of the ball scopes hemisphere would be positioned and placed the aluminium frame in such a way that the cover would correctly cover the telescope. I also used a compass to locate the geographic north (not the magnetic north) and started digging around the aluminium frame.
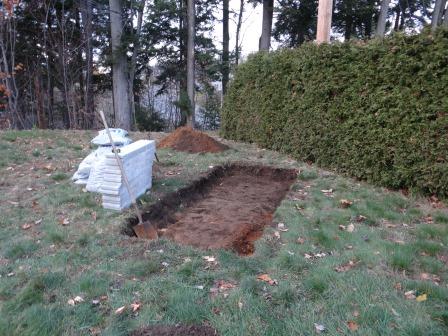
After excavating about 8 inches of soil over an area about 4 feet wide by 10 feet long, I filled the periphery of the cavity with 0-¾” crushed stone to create a level foundation to receive a series of cement borders used in landscaping work (I am lucky that the soil, under the top soil is pure sand, down to about 30 feet, minimizing soil movement).

I did not want to cast a single piece cement foundation, which is the classic way of doing this sort of construction. I wanted the shelter, including this modular foundation, to be very easily removeable so that I could take the whole thing with me if I moved. The solution was to use pre-cast universal cement borders like these: http://www.homedepot…straight/917836 . They each weigh about 90 pounds and measure 39″ long x 8″ high and are 3″ thick. They have grooves in each end (male on one end, female on the other) so they “tongue and groove” together for a solid assembly, at least when subjected to side forces. To reduce the effect of one border moving up or down in relation to the other borders, I devised an internal frame made of aluminium channels, bolted to each cement border, all at the same height (about midway up the 8″ high borders). These channels have threaded holes (3/8″ NC) in accurate locations. An aluminium flat bar with corresponding holes then covers the channels. A series of sixteen, 3/8″ diameter stainless steel bolts solidly attach the whole foundation structure together, reducing the risk of one of the cement borders rising or falling relative to the others.
Here are a few pictures showing this arrangement:

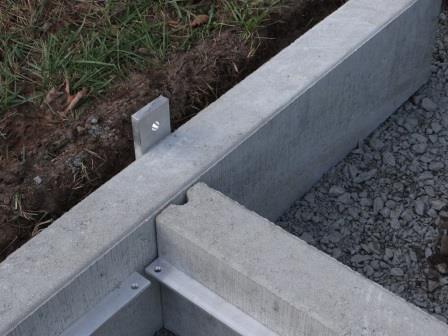
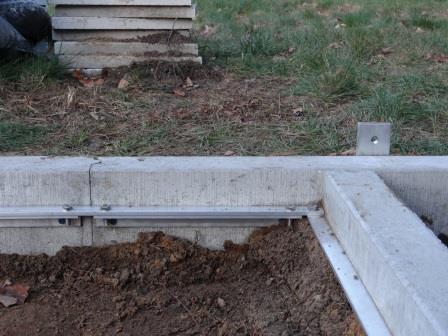
The last picture shows three of the cement borders attached together thru the bolting frame. You can also see one of the fixed aluminium hinge plates bolted to the exterior of the last cement border, to the north of the shelter foundation. This foundation is already a year old and made it through a very cold winter last year, without any significant movement.