Painting
The cover, before painting, looked really ugly. Something like a WW II bomb shelter. In order to make it prettier, and a little more discrete, I decided to paint it a light forest green color which would mix in well with the trees and grass in the backyard. I initaly thought of spray painting with little spray cans but quickly found they cost a fortune and it takes a lot of cans to cover such a big area. So I switched instead to conventional brush and roller.
Doing a good, lasting job painting aluminium is tricky. I chose a paint which the folks at Home Depot said works well for aluminium and does not need a primer. I’m still a little skeptical about my choice but decided to give it a try. The worst that can happen is that the paint will peel off early and will need to be redone.
A funny thing happened when I applied the first coat (I guess frustrating is a better term!). Late one afternoon in September I leave as early as I can from work (16h30) so I have enough time to apply the first coat before darkness, which at this time of the year happens around 19h00. By 17h45 I’m outside in the yard, paint brush and roller in hand, ready to go. I know it will be tight but I’m sure I can apply this first coat before sundown. The weather forecast for the next 24 hours is calling for clear skies. Not a rain cloud in view. Perfect conditions for doing this, I thought. An hour later, just as the last rays of the fall equinox sun dissapear under the horizon, success! I made it and that first coat looks perfect.
During the evening I keep an eye on the thermometer in the window since the shelter is outside in the back yard and it must not get too cold. I applied the paint at about 20 deg C and by bedtime it’s 16 deg C. Great, I tell myself, those are good temperatures for the paint to dry.
Notice in that last sentence there is the word “dry”.
Morning comes, and as hoped for and predicted it didn’t rain. Still dark outside but I notice the front of the shelter has different color patches. Strange. Just before leaving for work, all dressed up properly, I go out in the backyard in my suit to take a closer look at my masterpiece. Sun’s not up yet but I can clearly see the unfolding catastroph: During the previous evening I kept an eye on the thermometer to make sure it was warm enough for the paint to dry but completerly forgot about DEW.
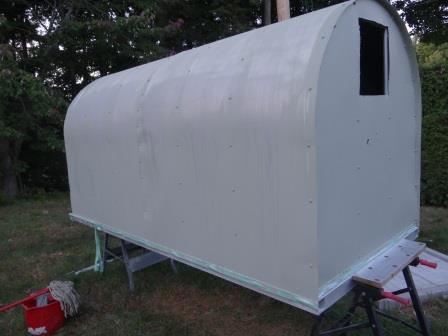
The paint on the top and side of the shelter was not dry by the time the sun went down. Then the DEW fell on top of the paint. What was to happen did. The paint started to thin out, drenched in water and by morning, most of it had dripped on the grass or, worst, had created long ugly drips on the painted cover. It’s not very clear but the picture above shows the result of the first coat after I cleaned off most of the paint. It’s as if I had painted the cover then left the lawn sprinklers on all night! I initially thought Home Depot had sold me bad paint but the vertical ends of the cover were practically dry (the side towards the forest was dry and the other side dried as soon as the morning sun hit it, without drips showing).
I knew I had no time to loose. Off came the suit, on came my “dirty close” and I spent the next 45 minutes cleaning the worst areas with generous amounts of water and soap while the paint was still wet. I could feel the paint drying as the morning air temperature rose and I was trying to remove the hardening drips before it was too late. Lesson learned: give enough time for outside paint to dry before evening DEW appears. Well, the following Saturday was nice and warm so I started over again and applied two coats of paint on the cover, this time between 10:00 in the morning and 16:00. The cover is now much nicer looking:
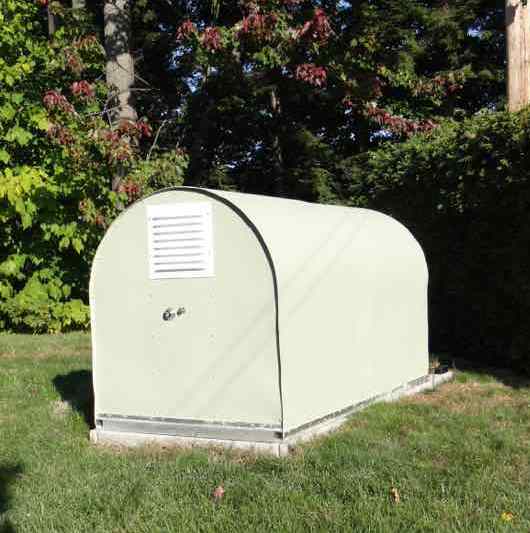
Telescope Cover Closed
Insulating the Inside
While I was working outside on the cover this summer, mounted on two workhorses, I had noticed how hot it got in there, even though it was 36 inches above ground with the two large ventilation grills at either end. The aluminium surface got so hot that I could not hold my hand against the inside of the cover when the sun was on that side. Even though the cover is aluminium its not shinyaluminium. I had measured a 12 deg C difference in the middle of summer between the inside and outside air temperatures. Something had to be done.
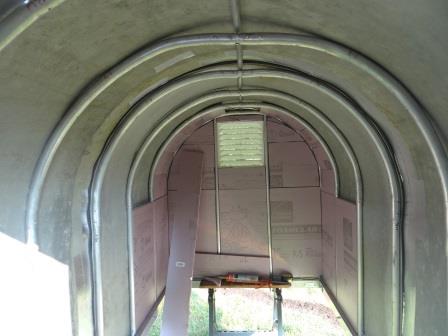
I read somewhere that the emissivity of highly polished aluminium is about 5% whereas heavily oxidized aluminium can go as high as 30%. My aluminium skin was closer to 30% emissivity. Idealy I would use a polished reflective panel separated by a vented air space and then the cover’s skin to keep the suns radiated heat from even reaching the cover’s surface. A tree blocking the sun would also work. But I could do neither, at least not from the outside. So, in order to slow that heat transmission down I decided to glue all of the inside of the cover with 1″ thick insulating foam panels with R5 insulation properties. As the following picture shows, I glued the insulation in small panels that I cut to fit between the aluminium pipes.
That insulation will not prevent the aluminium skin from absorbing and transmitting some of that solar radiated heat but should considerably slow the rate of transmission. I will have to wait next summer to measure the worst case inside temperature, under the high summer sun but I did notice how so much cooler the inside was when I was applying the insulation. Should I find it is still too hot next summer I may end up adding polished aluminium paper over the insulation (inside) to push the heat back into the insulation. I will see next summer. I may also end up adding a small fan to pull fresh, cooler air into the enclosure if need be. I will install a wireless thermometer inside the cover which transmits to a weather station in the house so I can monitor the temperature on a regular basis.
The insulation will also serve another purpose: I will probably add a low wattage heater inside (20 or 30 watts – some people add a small incandescent light bulb) just to keep the telescope from dewing or frosting up during the colder seasons, especially in the morning when the sun comes up and the air warms up faster than the instrumentation inside. There will be a learning curve to ensure the telescope is not being abused by its environment.